iOS App Development Tips : How to integrate “Sign In with Apple Button” in your Apps?
Being an top iOS app development company, we keep eye on latest trends and technology updates from Apple. This article is the output of it. After seeing WWDC 2019, our mobile app development lead and one of our experienced iOS developers wrote this article on how anyone can integrate ‘Sign in with Apple’ button in any iOS app.
We are very much familiar with signing in with Google and Facebook. It has been a criterion for app development for a very long time. However, on June 3, 2019, Apple announced the new ‘Sign in with Apple’ at the WWDC 2019 held at San Jose. This feature is compatible with versions iOS13 and later.
Sign In with Apple operates on iOS, macOS, tvOS, and watchOS. One can add Sign In with Apple to the website or versions of any app running on other platforms. The users can sign in anywhere the app is deployed once they set up their accounts.
Sign In with Apple is a fast and easy way to sign in to apps and websites. It enables the users to set up a user account in the application with their name, a verified email address and unique stable identifiers that allow the user to sign in with their Apple ID.
Last year in iOS 12 Apple introduced Password AutoFill, Automatic Strong Password, and Security Code AutoFill for advanced security and privacy constraint. This year, introducing sign in with Apple is another step taken towards better security and privacy.
Apple is making its sign-in needed whenever a third-party log-in option is provided. This third party option can be Facebook, Google, Instagram, Snapchat or any other. Apple has now provided its users with a private choice.
Why did Apple introduce the Sign In feature?
Apple is taking a determined stand to protect its user’s privacy. Rather than allowing other apps to see the user’s real email address, Apple will provide a proxy email address which will be unique to each app. The app developers will be still able to send emails to these provided proxy addresses. But at the same time, the developers will not be able to correlate users between apps. Also, the users can shut off their email forwarding per app.
Amidst embarrassments that have been caused by privacy and security breaches by Google and Facebook, this announcement from Apple is very much welcomed by the audience.
What can a Sign In with Apple do for its users?
1. Security
A user account must always be secure. ‘Sign In with Apple id’ gets automatically protected with two-factor authentication. This is using Touch ID or Face ID as a second layer of protection after the username/password combination.
» Check fraud
It can send alerts if the new account on your app is apparently not a real person using advanced machine learning. The developer can actually consider this alert while processing their anti-fraud tests or while granting permission to features in their apps.
» No more remembering different login Ids and Passwords
The user will be alerted if they already have an account with the app. They can use their existing email to login instead of creating a new one.
Now, let us discuss the technical part about how to integrate the Sign In with Apple feature into your apps.
Here is a step by step guide to integrate sign in with apple button in your iOS app :
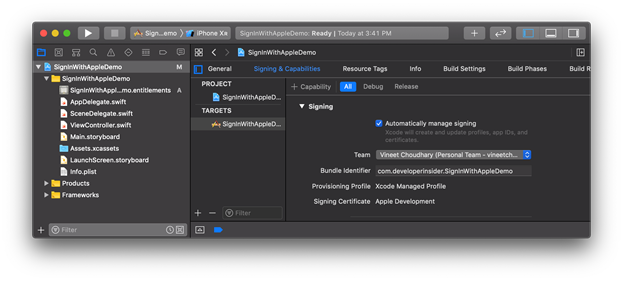
1. Configure Project
Create a new project and set the development team in the Signing & Capabilities tab so Xcode can create a provisioning profile.
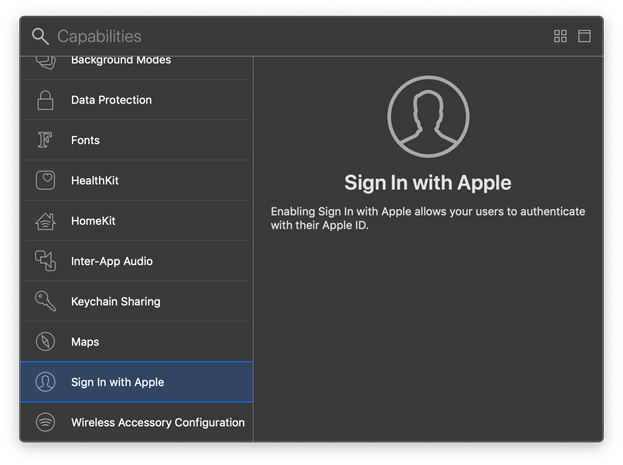
Once your project is created, add the Sign In with Apple capability in your project. This will enable your app to use Sign In with Apple.
2. Adding the Apple Log In button
AuthenticationServices framework renders ASAuthorizationAppleIDButton to allow the users to launch the Sign In with Apple flow. Adding the button to your app is simple. Create an instance of ASAuthorizationAppleIDButton and add a target for touchUpInside action. Once this is done, you can add the button in your view.
let authorizationButton = ASAuthorizationAppleIDButton() authorizationButton.addTarget(self, action: #selector(handleLogInWithAppleIDButtonPress), for: .touchUpInside) loginProviderStackView.addArrangedSubview(authorizationButton)
3. Handling Login Button Press
On the click of Sign In with Apple Button, you have to use a provider ASAuthorizationAppleIDProvider to create a request ASAuthorizationAppleIDRequest. This request is used to initialize a controller ASAuthorizationController that performs the request.
One or more of ASAuthorization.Scope values in the requestedscopes array can be used to request certain contact information from the user.
This is how the handleLogInWithAppleIDButtonPress action is implemented:
@objc private func handleLogInWithAppleIDButtonPress() { let appleIDProvider = ASAuthorizationAppleIDProvider() let request = appleIDProvider.createRequest() request.requestedScopes = [.fullName, .email] let authorizationController = ASAuthorizationController(authorizationRequests: [request]) authorizationController.delegate = self authorizationController.presentationContextProvider = self authorizationController.performRequests() }
4. Existing Account Setup Flow
There is a huge possibility that the user is already logged in with your application. You need to use both ASAuthorizationAppleIDProvider and ASAuthorizationPasswordProvider provider to create the request, which we then use to initialize a controller (ASAuthorizationController) that performs the request.
- ASAuthorizationPasswordProvider is a tool for performing requests to authenticate users depending on their Apple ID
- ASAuthorizationPasswordProvider is a device for producing requests to perform keychain credential sharing.
Handle ASAuthorizationController Delegate and Presentation Context
The ASAuthorizationController member gets an authorization ASAuthorization holding a credential ASAuthorizationAppleIDCredential that has an opaque user identifier.
private func performExistingAccountSetupFlows() { // Prepare requests for both Apple ID and password providers. let requests = [ASAuthorizationAppleIDProvider().createRequest(), ASAuthorizationPasswordProvider().createRequest()] // Create an authorization controller with the given requests. let authorizationController = ASAuthorizationController(authorizationRequests: requests) authorizationController.delegate = self authorizationController.presentationContextProvider = self authorizationController.performRequests() }
Configuring your Apple Developer Account
When you try to Sign In there is an AUTH_ALERT_SIGN_UP_NOT_COMPLETED error message display. Signing In won’t work in the app until you create a key with Sign in with Apple allowed in the developer account.
To facilitate Sign In with Apple creating an Auth Key with Sign In with Apple.
When you don’t see the Sign in with Apple listed when the key is created, you are probably in an Enterprise team. You can download the key to support Sign In with Apple from somewhere other than your application.
If you are generating a key for an assorted app then you create a key for your original App ID in order to implement Sign In with Apple. The user can your primary app’s icon at sign in and in their Apple ID account settings.
To Reset an Existing Account
Resetting an existing account to examine the first Sign In experience again then you need to:
● Open the Settings app of your iOS gadget.
● Hit the account in the Apple ID header.
● Continue to Password & security.
● Find the application under Applications using the Apple ID
● and swipe to delete it.
» Check Credential State
Use the userIdentifier that we got from ASAuthorizationAppleIDCredential object in the last step to check the user credential state.
» Register Domains and Emails for communication
If you wish to contact the users that use Apple’s private email relay service, register domains and email addresses that your organization will use for communication. To configure this, you need your Apple Developer Account. Click on More side menu on the Certificates, Identifiers & Profiles page.